Showing posts with label Tech Blog. Show all posts

Solved: How to use nmtui and nmcli tool to configure network in RedhatLinux

In this post we will see how to use nmtui for network management. This can be a very useful tool for starters in Redhat Linux 7.
  • Login to your server using putty and execute command “nmtui” to invoke the interface. If your machine is not in network you can login via console and follow the same steps mentioned below.
  • If you don’t have the nmtui tool installed, you can install it using yum (Note: If you don’t want to install a new package in your server you can use nmcli for network configuration. Refer the post for how to configure network with nmcli )
[root@cloudvedas ~]# yum install NetworkManager-tui
[root@cloudvedas ~]# nmtui
  • Once you get the interface you can navigate using Arrow keys , Tab key and make selection using “enter” key. So, using arrow key select “Edit a connection” and press enter.


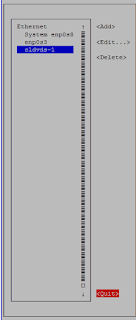
  • We have two network interfaces enp0s8 and enp0s3 . Today we will be configuring enp0s3. As enps0s8 is already configured and in use. So once highlighted enp0s3 go to “Add” and press enter.


  • Select the type of connection. For this tutorial we are selecting “Ethernet”.


  • Once in “Edit connection” section enter “Profile name” , “Device”.  If you want static IP select “Manual” for IPv4 and select “Show”.


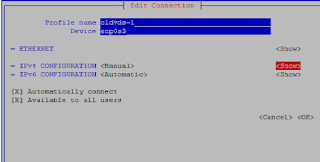
  • Once you select  “Show” enter your IP detail with subnet id. Here subnet id is /24 or 255.255.255.0 . Also enter gateway. If you want to use DNS enter DNS server details else leave it blank and select OK.


  • Once the IP configuration is done select “OK” again. Now you can see the new connection that you have created. Select “Quit” to come out.


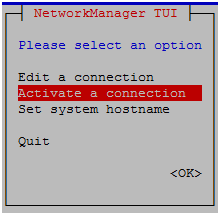
  • Now let’s activate the connection. Execute “nmtui” in putty or console again and select “Activate a connection”  and press Enter.


  • Navigate with arrow key select the interface and then move right and Press enter on “Activate”. This will activate your interface as in image below.

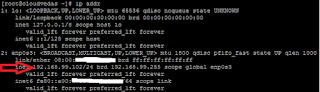
  • Check if the new IP is configured.


  • Also let’s check in “nmcli” about the new connection.


If you want to change hostname refer this post on how to change hostname with nmtui or nmcli .
Hope this post is helpful. Do let me know if you have any query.

Solved: How to lock Terraform provider version

While working with terraform you would have noticed that every time you execute a terraform plan it will download the latest version of terraform available for that provider.
While this is good if you are testing as you get the latest features but, it can create trouble in production if a buggy version gets deployed. So, it is always recommended that you lock down the version of provider. In this post we will show you how to do that.
It’s really very simple to lock down the provider version. You just have to add a snippet like below in your main.tf file .


provider "aws" {
  version="<=2.6.0"
  region  = "us-east-1"
}

In the above example we have specified that version 2.6.0 or older can be used.
The version argument value may either be a single explicit version or a version constraint string. Constraint strings use the following syntax to specify a range of versions that are acceptable:
>= 2.4.0: version 2.4.0 or newer
<= 2.4.0: version 2.4.0 or older
~> 2.4.0: any non-beta version >= 2.4.0 and < 2.5.0, e.g. 2.4.X
~> 2.4: any non-beta version >= 2.4.0 and < 3.0.0, e.g. 2.X.Y
>= 2.0.0, <= 3.0.0: any version between 2.0.0 and 3.0.0 inclusive
Give it a try and let us know if you have any query or suggestion.

Solved : How to simply install python pip on windows?

The latest version of python is shipped with pip. But, if you are using older version of python 2(<2.7.9) or python 3(<3.4) and still need pip on windows please follow the instruction below.
If pip is not installed or the path is not set correctly you will get an error like below while invoking it in windows command prompt.
pip install sklearn'pip' is not recognized as an internal or external command,operable program or batch file.
Here are the steps to get pip in your windows box.
  • Download get-pip.py . Copy and paste the contents of the link in a notepad and save it as get-pip.py, remember not in .txt format but .py format.
  • Next install it.
python get-pip.py
  • Find the recently installed pip.exe in your machine. It’s generally in C:\Python27\Scripts or similar folder depending on the python version you installed. You can set the path variable in windows using these instructions.
– Search for “Advanced System Settings” in your windows machine.
– Click on the tab “Advanced”. In it click on Environment Variables.
– In the new window click on System Variables.  Select “Path” and click on “Edit”.
– Click on new and enter C:\Python27\Scripts\ in the space.
– Finally click ok to all windows and re-open command prompt.
  • If you have followed the instructions correctly you will now be able to install packages using pip.
pip install sklearn
That’s all you need to install pip in windows.
Tip:- Some people make mistake of executing pip from Python interpreter and get the below error.

>>> pip install sklearn
File "<stdin>", line 1
pip install sklearn^SyntaxError: invalid syntax
>>>

But, from the above tutorial you now know that pip is installed and executed from command prompt and not from the interpreter.
Hope you find this simple tutorial useful. Let us know in comment section if you face any issue.

Solved : How to check disk usage in windows like Linux

Identifying the files or directories which are hogging space in your windows machine can be very difficult specially if you have hidden files or they are in nested directories.

If you have worked on Linux you will know it has a very useful command du -sh. When i work on windows  I really miss the Linux command which is very handy.

Thankfully you can find a utility at sysinternals on microsoft site which do the same job as du command in linux.

The name of utility is simply “du” and you can download it from here .

Once you download the utility you just have unzip it and no installation needed.

After that open the command prompt as admin user and go to the directory where you have unzipped the “du” and execute it as below to find the usage of any directory.

du -l 1 "C:\Program Files\Microsoft SQL Server"

It will show you usage of even the hidden files. The usage is shown in KB.

Solved: How to change from EFI to SMI label and vice-versa

Hello!
In this post we will see how to change the disk label from EFI to SMI in a Solaris server.
Before you decide to change the disk label ensure that the disk doesn't have any important data. If needed take backup of the disk. As during label change all the data will be removed from the disk.
We will use "format -e" command to change the label on disk.
root@cldvds# format -e c0t6006023764A62A00C5H174886B5BC267d0

format> la
 [0] SMI Label
 [1] EFI Label
 Specify Label type[1]: 0
 Auto configuration via format.dat[no]?
 Auto configuration via generic SCSI-2[no]?

Geometry: 256 heads, 10 sectors 40960 cylinders result in 104857600 out of 104857600 blocks.
 Do you want to modify the device geometry[no]? yes
 format> p
The disk partition should now change from 0 to 9 slices(EFI) to 0 to 7 slices (SMI).
If you want to change from SMI to EFI you can follow the same steps and instead of choosing option 0 choose option 1.
That's all folks! Do comment if you have any concern or query!

Solved: Create virtual environment with python 3 in linux

Once you have installed python 3.6 as described in the last post you can create virtual environment to work with it.
  • First let’s install the package of virtual environment for python 3.
CentOS/RHEL
sudo yum install -y python3-venv
Ubuntu
sudo apt-get install -y python3-venv 
  • Create a directory for you virtual environment and get inside it.
mkdir virtualenvscd virtualenvs
  • Now let’s create our virtual environment.
python3.6 -m venv cloudvedasenv
  • Finally activate the new virtual environment. Notice the new environment name in brackets once you run the source command. That means you are now inside the virtual environment.
[ec2-user@cloudvedas ~]$ source cloudvedasenv/bin/activate
(cloudvedasenv) [ec2-user@cloudvedas ~]$
  • If you want to install a package inside the virtual environment you can use pip .
(cloudvedasenv) [ec2-user@cloudvedas ~]$ pip install zappa requests flask

Solved: Install Python 3 in Linux and set it as default

In this post we will show you how to install python 3 in a Linux box. We have Centos 7 installed in our server.
Check installed python version
Most of the Linux versions by default have python installed. So let's check the current version.
[ec2-user@cloudvedas ~]$ python --version
 Python 2.7.5
[ec2-user@cloudvedas ~]$
As we can see from the above output, currently we have Python 2 installed and we need Python 3 so let's install it.
Install pre-requisites
Before we install python 3 let's first update the yum.
[ec2-user@cloudvedas ~]$ sudo yum -y update
Also, install yum utils.
[ec2-user@cloudvedas ~]$ sudo yum -y install yum-utils
And at the end install the CentOS development tools which will help you build and compile software from source code.
[ec2-user@cloudvedas ~]$ sudo yum -y groupinstall development
Install python 3.6.4
The standard yum repos does not have the latest python release, so we will install IUM (Inline with Upstream Stable) which will have the latest packages.
[ec2-user@cloudvedas ~]$ sudo yum -y install https://centos7.iuscommunity.org/ius-release.rpm
Now let's install Python 3.6.
[ec2-user@cloudvedas ~]$ sudo yum -y install python36u
Next we will install pip, which will manage software packages for Python:
[ec2-user@cloudvedas ~]$ sudo yum -y install python36u-pip
Finally, we will install the development packages.
[ec2-user@cloudvedas ~]$ sudo yum -y install python36u-devel
Let' check our  python version
[ec2-user@cloudvedas ~]$ python3.6 -V
Python 3.6.4
[ec2-user@cloudvedas ~]$
Update default python
But if you still run the normal command to check python version it will show the Python 2 version if it was installed by default.
[ec2-user@cloudvedas ~]$ python --version
 Python 2.7.5
 [ec2-user@cloudvedas ~]$
To reflect the new python version by default you create an alias in .bashrc file as described below in the last line of the file.
[ec2-user@cloudvedas ~]$ sudo vi ~/.bashrc

# .bashrc
# Source global definitions
if [ -f /etc/bashrc ]; then . /etc/bashrc fi
# Uncomment the following line if you don't like systemctl's auto-paging feature:
# export SYSTEMD_PAGER=
# User specific aliases and functions
alias python=python3.6
After making the changes save the file. Now, logout and login again, it should show you the new version.
[ec2-user@cloudvedas ~]$ python -V
Python 3.6.4
[ec2-user@cloudvedas ~]$
Check all installed python versions
Do remember that the default python 2 will still remain in the system as lot of system binaries have dependency on it.
To check all the python versions in your box you can check the installed packages as below.
[ec2-user@cloudvedas ~]$ yum list installed | grep -i python
If you want to create virtual environments in python read our next post.

Solve: How to add an EBS volume to a Windows EC2 instance and configure it

This post is divided in two sections. In the first section you will see how to create an EBS volume and in the next section we will show you how to configure the EBS volume in windows instance.
Create EBS Volume
  • Go to AWS Console > EC2
  • In the left panel select “Volumes” .
  • Once in the “Volume” screen select “Create Volume”
  • In the “Create Volume” window specify the size of disk and the Availability Zone  in which you want the disk to be created.
Tip:- The disk should be in same AZ as your EC2 instance.
  • Now in the left pane again select the “Volume” to see all your volumes.
  • Select the volume you just created and after that in the upper menu click on “Actions” and select “Attach volume”
  • In “Attach volume” window select the instance to which you want to attach the volume and click on “Attach”.

Configure EBS volume in Windows
  • Login to your windows EC2 instance using RDP. Once inside the instance, from the Start menu go to  “Computer Management” as mentioned below.
Start > Control Panel > System and Security > Administrative Tools > Computer Management
  • Click on Disk Management on the left pane.
  • Here we can see the new disk but it’s still offline. Right click on the new disk and select “Online”.
  • Once the disk is online right click again on the disk and select “Initialize Disk”.

  • If disk is below 2TB, select MBR and click OK
  • Finally right click on the pane where size is shown(refer image below). Select “New Simple Volume”
  • Leave other options as default and click “Next” till you come to “Assign Drive Letter or Path”.  Here we have assigned the drive letter E .
  • Leave everything else as default in next windows and click on finish.
  • Now if we go to “This PC/ My computer” we should see the new disk.


So here we have attached an EBS volume to the Windows EC2 instance. Do let us know in comments section if you have any query.


Solved: How to extend or grow a linux filesystem under LVM

In this post we will see how to grow a Linux filesystem without reboot.
  • Let's check our current filesystem. We want to extend this filesystem by 200MB.
[root@cloudvedas CVFS1]# df -h /CVFS1
Filesystem                  Size Used Avail Use% Mounted on
/dev/mapper/cvsvg-cldvdsvol1 47M 12M    32M  26%   /CVFS1
[root@cloudvedas CVFS1]#
  • First check if we have free space in VG
[root@cloudvedas /]# vgs
 VG    #PV    #LV    #SN    Attr    VSize    VFree
 cvsvg  1      1      0      wz--n- 196.00m  144.00m
 rhel   1      3      0      wz--n- 7.51g    36.00m
[root@cloudvedas /]#
  • Since we don't have 200MB free in "cvsvg" so we will add a new disk to it. First label the disk for LVM and get it under LVM control using pvcreate.
[root@cloudvedas CVFS1]# pvcreate /dev/sdb2
 Physical volume "/dev/sdb2" successfully created
[root@cloudvedas CVFS1]#
  • Add the new partition to our VG.
[root@cloudvedas CVFS1]# vgextend cvsvg /dev/sdb2
 Volume group "cvsvg" successfully extended
[root@cloudvedas CVFS1]#
  • Check the VG size again.
[root@cloudvedas CVFS1]# vgs
 VG    #PV   #LV    #SN    Attr    VSize    VFree
 cvsvg  2     1      0     wz--n-  444.00m  392.00m
 rhel   1     3      0     wz--n-  7.51g    36.00m
[root@cloudvedas CVFS1]#
  • Now we have the required space so, let's extend the volume first.
[root@cloudvedas CVFS1]# lvextend -L +200M /dev/cvsvg/cldvdsvol1
 Size of logical volume cvsvg/cldvdsvol1 changed from 52.00 MiB (13 extents) to 252.00 MiB (63 extents).
 Logical volume cldvdsvol1 successfully resized
  • On checking the LV we can see it's now extended as is now of 252MB.
[root@cloudvedas CVFS1]# lvs
 LV VG Attr LSize Pool Origin Data% Meta% Move Log Cpy%Sync Convert
 cldvdsvol1 cvsvg -wi-ao---- 252.00m
 root rhel -wi-ao---- 6.67g
 swap rhel -wi-ao---- 820.00m
 testvol1 rhel -wi-a----- 4.00m
[root@cloudvedas CVFS1]#
  • Let's increase the filesystem now using resize2fs.
[root@cloudvedas CVFS1]# resize2fs /dev/cvsvg/cldvdsvol1
resize2fs 1.42.9 (28-Dec-2013)
Filesystem at /dev/cvsvg/cldvdsvol1 is mounted on /CVFS1; on-line resizing required
old_desc_blocks = 1, new_desc_blocks = 2
The filesystem on /dev/cvsvg/cldvdsvol1 is now 258048 blocks long.
  • Check the file system now.
[root@cloudvedas CVFS1]# df -h /CVFS1
Filesystem                   Size Used Avail Use% Mounted on
/dev/mapper/cvsvg-cldvdsvol1 241M  13M  217M  6%   /CVFS1
[root@cloudvedas CVFS1]#
Great so we have now extended the filesystem.

Solved: How to label a disk in Linux

In this post we will see how to label a new disk in Linux and create a new LVM partition.
Step 1 Scan the new LUNS.
Step 2 List the available disks and identify the one you want to use.
  fdisk -l |grep /dev/ |grep -v dm
Step 3 Use fdisk to label the disk. Here we are using disk sdb .
[root@cloudvedas scsi_host]# fdisk /dev/sdb
 Welcome to fdisk (util-linux 2.23.2).

Changes will remain in memory only, until you decide to write them.
 Be careful before using the write command.

Device does not contain a recognized partition table
 Building a new DOS disklabel with disk identifier 0x909f2c7b.

Command (m for help): p

Disk /dev/sdb: 1073 MB, 1073741824 bytes, 2097152 sectors
 Units = sectors of 1 * 512 = 512 bytes
 Sector size (logical/physical): 512 bytes / 512 bytes
 I/O size (minimum/optimal): 512 bytes / 512 bytes
 Disk label type: dos
 Disk identifier: 0x909f2c7b

Device Boot Start End Blocks Id System

Command (m for help):
Step 4 Create Primary partition using option "n" of size 200MB.
Command (m for help): n
 Partition type:
 p primary (0 primary, 0 extended, 4 free)
 e extended
 Select (default p): p
 Partition number (1-4, default 1):
 First sector (2048-2097151, default 2048):
 Using default value 2048
 Last sector, +sectors or +size{K,M,G} (2048-2097151, default 2097151): +200M
 Partition 1 of type Linux and of size 200 MiB is set
(Don't miss the + used before 200M. It's very critical else it won't work as expected)
Step 4 Now let's check our new partition
Command (m for help): p

Disk /dev/sdb: 1073 MB, 1073741824 bytes, 2097152 sectors
 Units = sectors of 1 * 512 = 512 bytes
 Sector size (logical/physical): 512 bytes / 512 bytes
 I/O size (minimum/optimal): 512 bytes / 512 bytes
 Disk label type: dos
 Disk identifier: 0xc1c8c781

Device Boot Start End Blocks Id System
 /dev/sdb1 2048 411647 204800 83 Linux

Command (m for help):
Step 5 In the above output we can see that the new partition is a standard linux partition.  Let's Change the partition type to Linux LVM. Here we will use "8e" which is a Hex code for LVM. You can type L to list all codes.
Command (m for help): t
 Selected partition 1
 Hex code (type L to list all codes): 8e

-Changed type of partition 'Linux' to 'Linux LVM'

Command (m for help): p

Disk /dev/sdb: 1073 MB, 1073741824 bytes, 2097152 sectors
 Units = sectors of 1 * 512 = 512 bytes
 Sector size (logical/physical): 512 bytes / 512 bytes
 I/O size (minimum/optimal): 512 bytes / 512 bytes
 Disk label type: dos
 Disk identifier: 0xc1c8c781

Device Boot Start End Blocks Id System
 /dev/sdb1 2048 411647 204800 8e Linux LVM

Command (m for help):
Step 6 Finally save the changes with option "w"
Command (m for help): w
The partition table has been altered!

Calling ioctl() to re-read partition table.
Syncing disks.
Step 7 Let's list the partition table to cross check that our partition table is saved correctly.
[root@cloudvedas /]# fdisk -l /dev/sdb

Disk /dev/sdb: 1073 MB, 1073741824 bytes, 2097152 sectors
 Units = sectors of 1 * 512 = 512 bytes
 Sector size (logical/physical): 512 bytes / 512 bytes
 I/O size (minimum/optimal): 512 bytes / 512 bytes
 Disk label type: dos
 Disk identifier: 0x0aa5ab95

Device Boot Start End Blocks Id System
 /dev/sdb1 2048 411647 204800 8e Linux LVM
 [root@cloudvedas /]#
Cool! So, we have now a LVM partition which we can bring under LVM control using pvcreate.

LVM Crash course

In this post we will give you a crash course on Linux LVM (Logical Volume Manager). This post will cover the most used LVM commands in a Linux Admin life.
Before we start first let's go through the concepts.
Physical Volumes (PVs): Storage devices (physical hard disks, partitions, RAID arrays etc.) provides raw storage
Volume Groups (VGs): Combine multiple PVs to create a group. They can be mirror or concatenation of PVs.
Logical Volumes (LVs): Create smaller volumes from the Volume Group(VG) as per your size requirement. You can can use the LVs to create filesystem on them.
Below commands are for RHEL 7.
All the below commands will require root access. You can either run them with sudo  or switch to root user as mentioned below.
sudo su -
Install LVM
[root@cloudvedas ~]# yum install lvm2*
Check LVM version
[root@cloudvedas ~]# lvm version
Label the new disk and bring it under LVM using pvcreate
Create PV (Physical Volume)
[root@cloudvedas ~]# pvcreate /dev/sdb1
Show PV
[root@cloudvedas ~]# pvs /dev/sdb1
Create VG (Volume Group)
[root@cloudvedas ~]# vgcreate cvsvg /dev/sdb1
Show VG
[root@cloudvedas ~]# vgs cvsvg
Display VG
[root@cloudvedas ~]# vgdisplay cvsvg
Extend VG
[root@cloudvedas ~]# vgextend cvsvg /dev/sdb2
Create LV (Logical Volume)
[root@cloudvedas ~]# lvcreate -L 500M cvsvg -n cldvdsvol1
Display LV 
[root@cloudvedas ~]# lvdisplay /dev/cvsvg/cldvdsvol1
Create mirror volume
 lvcreate -L 100M -m1 -n cvmirrorvol1 cvsvg
Create striped volume
[root@cloudvedas ~]# lvcreate -L 50M -i 3 -I 64 -n stripevol cvsvg
Here
-i|--stripes (Number of disks in stripe)
-I|Stripe size
Extend LV
lvextend -L +20M /dev/cvsvg/stripevol
De-activate volume
lvchange -an /dev/cvsvg/stripevol
Activate volume
lvchange -ay /dev/cvsvg/stripevol
Remove LV
Ensure filesystem is unmounted before running this
lvremove /dev/cvsvg/stripevol
Create filesystem
mkfs -t ext4 /dev/cvsvg/cldvdsvol1
Create directory
mkdir /CVFS1
Mount filesystem
mount /dev/cvsvg/cldvdsvol1  /CVFS1
All the available LVM commands
[root@cloudvedas ~]# lvm help
 Available lvm commands:
 Use 'lvm help <command>' for more information

devtypes Display recognised built-in block device types
 dumpconfig Dump configuration
 formats List available metadata formats
 help Display help for commands
 lvchange Change the attributes of logical volume(s)
 lvconvert Change logical volume layout
 lvcreate Create a logical volume
 lvdisplay Display information about a logical volume
 lvextend Add space to a logical volume
 lvmchange With the device mapper, this is obsolete and does nothing.
 lvmdiskscan List devices that may be used as physical volumes
 lvmsadc Collect activity data
 lvmsar Create activity report
 lvreduce Reduce the size of a logical volume
 lvremove Remove logical volume(s) from the system
 lvrename Rename a logical volume
 lvresize Resize a logical volume
 lvs Display information about logical volumes
 lvscan List all logical volumes in all volume groups
 pvchange Change attributes of physical volume(s)
 pvresize Resize physical volume(s)
 pvck Check the consistency of physical volume(s)
 pvcreate Initialize physical volume(s) for use by LVM
 pvdata Display the on-disk metadata for physical volume(s)
 pvdisplay Display various attributes of physical volume(s)
 pvmove Move extents from one physical volume to another
 pvremove Remove LVM label(s) from physical volume(s)
 pvs Display information about physical volumes
 pvscan List all physical volumes
 segtypes List available segment types
 tags List tags defined on this host
 vgcfgbackup Backup volume group configuration(s)
 vgcfgrestore Restore volume group configuration
 vgchange Change volume group attributes
 vgck Check the consistency of volume group(s)
 vgconvert Change volume group metadata format
 vgcreate Create a volume group
 vgdisplay Display volume group information
 vgexport Unregister volume group(s) from the system
 vgextend Add physical volumes to a volume group
 vgimport Register exported volume group with system
 vgmerge Merge volume groups
 vgmknodes Create the special files for volume group devices in /dev
 vgreduce Remove physical volume(s) from a volume group
 vgremove Remove volume group(s)
 vgrename Rename a volume group
 vgs Display information about volume groups
 vgscan Search for all volume groups
 vgsplit Move physical volumes into a new or existing volume group
 version Display software and driver version information
[root@cloudvedas ~]#

Solved: How to check remote port status in windows server 2016 without telnet


Telnet was always a security risk as data transfer is not secure on it. Seems like Microsoft has now finally removed it from Windows Server 2016.

We generally use telnet to check if a port is open on the remote server. So, how to check it now without telnet?

Instead of telnet you can use powershell commands to check the connections.

Please follow below steps for details.
Search for Windows powershell and open its console in your Windows 2016 server.
Use “Test-NetConnection ” command to check the port status. Let’s check if ports 3389 is open.

 Test-NetConnection 10.0.1.15 -port 3389

If port is open you will get output like below.

ComputerName : 10.0.1.15
RemoteAddress : 10.0.1.15
RemotePort: 3389
InterfaceAlias : Ethernet 3
SourceAddress :  10.0.1.37
TcpTestSucceeded : True

Else, you will get failed message. In the below example we can see that the ping reply succeeded as ICMP is allowed, but “TcpTestSucceeded” is false as remote port 3389 is not open.

WARNING: TCP connect to 20.0.1.18:3389 failed
ComputerName : 20.0.1.18
RemoteAddress : 20.0.1.18
RemotePort : 3389
InterfaceAlias : Ethernet 3
SourceAddress : 10.0.1.37
PingSucceeded : True
PingReplyDetails (RTT) : 147 ms
TcpTestSucceeded : False


Tip:- Read this post for checking port in Linux without telnet .

AWS S3 CLI - Cheat sheet

Below is the cheat sheet of AWS CLI commands for S3.
If you are new to S3 it’s recommended that you go through this free AWS S3 crash course.
If you want to know how to install AWS CLI, follow steps on this post.
Get help
aws s3 help
or
aws s3api help
Create bucket
aws s3 mb s3://bucket-name 
Removing bucket
aws s3 rb s3://bucket-name
To remove a non-empty bucket (Extremely careful while running this). This will remove all contents in the bucket including subfolders and data in them.
aws s3 rb s3://bucket-name --force
Copy object
aws s3 cp mypic.png s3://mybucket/
Copy buckets
aws s3 cp myfolder s3://mybucket/myfolder --recursive
(Note: –recursive will copy recursively everything including the subfolders)
Sync buckets
 aws s3 sync <source> <target> [--options]

List buckets
aws s3 ls
List specific bucket
aws s3 ls s3://mybucket
Bucket location
aws s3api get-bucket-location --bucket <bucket-name>
Logging status
aws s3api get-bucket-logging --bucket <bucket-name>
ACL (Access Control List)
The following example copies an object into a bucket. It grants read permissions on the object to everyone and full permissions (read, readacl, and writeacl) to the account associated with user@example.com.
aws s3 cp file.txt s3://my-bucket/ --grants read=uri=http://acs.amazonaws.com/groups/global/AllUsers full=emailaddress=user@example.com

Solved : Comparing Run Levels in Linux and Solaris and precautions withthem

Many people get confused between run levels in Linux and Solaris. One major difference among these can be disastrous also.  In this post we will show you the different Run levels in both these OS and what precautions you should take while working on these.
Let’s first take a look at Run levels.
Linux Run Levels
IDNameDescription
0HaltNo activity, System can be safely shut down.
1Single-user modeFor administrative tasks only. Rarely used.
2Multi-user modeMultiple users but no NFS (Network File System).
3Multi-user mode with networkingMultiple user but command line mode only.
4Not used/user-definableFor special purposes. User definable.
5Start the system normally with appropriate display manager (with GUI)It’s similar to run level 3 but with GUI display.
6RebootReboots the system.
Solaris Run levels
IDNameDescription
0Power-down statePower down state(OBP level after POST). Will bring server to OK prompt for maintenance.
s or SSingle-user stateTo run as a single user with all file systems mounted and accessible. Only root user is allowed login.
1Single User – Administrative stateTo access all available file systems with user logins allowed.
2Multi-user modeMultiple users but no NFS(Network File System). i.e. all daemons running except NFS daemon.
3Multi-user mode with networkingAll daemons running including NFS with GUI.
4Not used/user-definableFor special purposes. User definable.
5Power-offShutdown gracefully. Difference from Level 0 is that you won’t get any OBP (OK) prompt in Level 5
6RebootReboots the system.
Precaution
Not sure if you have noticed but there is major difference in Run Level 5 of both the OS. For Linux, run level 5 means multi user with GUI, all good. But for Solaris, run level 5 means power-off, ouch! . Many Linux admins who start working on Solaris makes the mistake of executing “init 5” on Solaris to get the GUI but, that actually brings down a Solaris server. Hope you never make this mistake on production box.
Check current run level
who -r
Above command will tell  you the current level of your system.

Certified Scrum Master Sample Exam Questions

In our last post we have seen how to prepare for CSM exam and the efforts and  cost involved in it.
Below are some of the sample questions for CSM exam. You can get many such practice questions here .
Which of the following is a characteristic of a good Scrum Team?
A) Its members all have similar skills.
B) It waits for tasks to be assigned to it.
C) It seeks direction from the ScrumMaster.
D) It is self-organizing.
Answer D
Which of the following is a responsibility of the product owner?
A) Determine the team composition necessary for success
B) Determine the appropriate release dates
C) Determine the appropriate solution or approach for the product
D) Determine the length of the sprint
Answer B
Which technique might a ScrumMaster use to facilitate communication between the Development Team and the Product Owner?
A) Teach the Product Owner about the development processes employed by the Development Team during the Sprints.
B) Teach the Development Team to communicate in terms of business needs and objectives.
C) Facilitate collaborative meetings between the Development Team and the Product Owner.
D) All of these
Answer D
Q:”The CEO asks the Development Team to add a “very important” item to the current Sprint. What should the Development Team do?”
A) Add the item to the current Sprint without any adjustments.
B) Add the item to the current Sprint and drop an item of equal size.
C) Add the item to the next Sprint.
D) Inform the Product Owner so he/she can work with the CEO.
Answer D
What are the desirable qualities of a Product Vision?
A) Outlines traceability back to overall corporate governance in IT investment
B) Provides a complete breakdown structure of the ROI formula
C) Features a detailed overview that enlightens and inspires
D) Describes why the project is pursued and the product desired end state
Answer D
Above questions are taken from public internet and answers are based on our understanding. Please contact us if you have any query or concern.

How to take zfs snapshot and rollback

In this post we will discuss how to take ZFS snapshot and restore data using that snapshot.

If you want to take snapshot of a ZFS filesystem the syntax is simple.

zfs snapshot pool/filesystem@somename

Let’s take an example, we have a zpool named “cvpool” and it has a filesystem "cldvdsfs".

  • If we wanting​ to take a snapshot of this filesystem on weekend we will give snapshot a name let’s say “sunday”.
zfs snapshot cvpool/cldvdsfs@sunday
  • Now if you do a “zfs list” you should see the zfs snapshot.
# zfs list
NAME                      USED AVAIL REFER MOUNTPOINT
cvpool                     500M 4.40G 22K /cvpool
cvpool/cldvdsfs             22K 500M  22K /cvpool/cldvdsfs
cvpool/cldvdsfs@sunday        0   -   22K   -
#
  • Have a look at the content of the filesystem. We can see 5 test files.
# cd /cvpool/cldvdsfs

# ls
test1 test2 test3 test4 test5
#

Rollback

  • If you want to do a rollback/restore of this snapshot on the filesystem you can simply do it by:-
zfs rollback pool/filesystem@sunday
  • Let's give it a try  by removing some files.
# rm test5
# rm test4
# ls
 test1 test2 test3
  • Now when we try rollback we should see all our data back.
# zfs rollback cvpool/cldvdsfs@sunday

# cd /cvpool/cldvdsfs
# ls
 test1 test2 test3 test4 test5
#

So we can see above we got our removed files back.

Remote backup

  • Let's try sending the snapshot on a different filesystem or on a remote server NFS filesystem. This is very useful for backup purposes where the data is stored on a different server.
# zfs send cvpool/cldvdsfs@sunday > /remoteNFS/sunday.snap
  • Let's check our snapshot size
-rw-r--r-- 1 root root 14K Sep 23 07:52 sunday.snap
  • Zip the snapshot

You also have an option to zip the snapshot to save space. Like in below example the snapshot got shrinked by 94% .

# gzip -9 -v /remoteNFS/sunday.snap
 /remoteNFS/sunday.snap: 94.0% -- replaced with /remoteNFS/sunday.snap.gz
#

-rw-r--r-- 1 root root 899 Sep 23 07:52 sunday.snap.gz
  • Now let's  create a new ZFS filesystem sunday and try to restore the snapshot on it.
# zfs create cvpool/sunday

# zfs list
 NAME USED AVAIL REFER MOUNTPOINT
 cvpool 500M 4.40G 22K /cvpool
 cvpool/cldvdsfs 22K 500M 22K /cvpool/cldvdsfs
 cvpool/cldvdsfs@sunday 0 - 22K -
 cvpool/sunday 21K 4.40G 21K /cvpool/sunday
  • Currently our new filesystem has nothing in it.
# cd /cvpool/sunday
# ls
#

Unzip the snapshot

Let's unzip and restore the snapshot.

# gzip -d -c /remoteNFS/sunday.snap.gz | zfs receive -F cvpool/sunday

Note:- When you restore the snapshot the filesystem /cvpool/sunday should not be in use else you will get device busy error.

  • We can now see our files in the the sunday filesystem.
 # cd /cvpool/sunday
 # ls
 test1 test2 test3 test4 test5
 #
  • You can make the restored snapshot as your main filesystem by renaming it.

So here we will first rename the current filesystem to old.

 # zfs rename cvpool/cldvdsfs cvpool/cldvdsfs.old
 # zfs list
 NAME USED AVAIL REFER MOUNTPOINT
 cvpool 500M 4.40G 24K /cvpool
 cvpool/cldvdsfs.old 40K 500M 22K /cvpool/cldvdsfs.old
 cvpool/cldvdsfs.old@sunday 18K - 22K -
 cvpool/sunday 22K 4.40G 22K /cvpool/sunday
 cvpool/sunday@sunday 0 - 22K -
  • Now we will make the filesystem which was restored from sunday snapshot as main.
 # zfs rename cvpool/sunday cvpool/cldvdsfs
 # zfs list
 NAME USED AVAIL REFER MOUNTPOINT
 cvpool 500M 4.40G 24K /cvpool
 cvpool/cldvdsfs 40K 4.40G 22K /cvpool/cldvdsfs
 cvpool/cldvdsfs@sunday 18K - 22K -
 cvpool/cldvdsfs.old 40K 500M 22K /cvpool/cldvdsfs.old
 cvpool/cldvdsfs.old@sunday 18K - 22K -
 #

Solved: Error on labeling the disk

You may get below error when you are trying to label a new disk in Solaris.

format> la
 WARNING - This disk may be in use by an application that has
 modified the fdisk table. Ensure that this disk is
 not currently in use before proceeding to use fdisk.

Solution:-

Before you proceed for the solution ensure that this is the correct disk which you want to label.

  • Once you are sure about the correct disk, select the disk from the format menu.
  • Before you try labeling the disk execute "fdisk" while in format menu.
format> fdisk
 No fdisk table exists. The default partition for the disk is:

a 100% "SOLARIS System" partition

Type "y" to accept the default partition, otherwise type "n" to edit the
 partition table.
  • Once you press "y" it will accept the default disk layout.
  • Now you can also change the disk layout format as per your requirement and finally label the disk.

Solved: How to get out of Virtual box console window

You can easily get out of the virtual box machine console window by pressing the “ctrl” button on the right side of the keyboard. i.e. the “ctrl” button which is near the arrow keys.

Solved: docker - error during connect

sagu@sagu-pc MINGW64 ~$ docker image lserror during connect: Get http://%2F%2F.%2Fpipe%2Fdocker_engine/v1.29/images/json: open //./pipe/docker_engine: The system cannot find the file specified. In the default daemon configuration on Windows, the docker client must be run elevated to connect. This error may also indicate that the docker daemon is not running.sagu@sagu-pc MINGW64 ~
If you are getting above error while running the docker commands in Docker Quickstart Terminal then you can have one of the listed problem.
  • The docker deamon is not running.
  • The docker host machine itself is down.
  • Required configuration file is missing.
First check that the host machine is up and the configuration file is present at its location. Once you are sure both the above things are ok, in that case easiest way to get rid of this issue is to open the Docker Quickstart Terminal by selecting “Run as Administrator” .  It will take some time to start but let it complete and you should be back in business soon.

Solved: How to allow remote root login in Solaris

In this post we will show you how you allow root login to a solaris sevrer from a remote machine.
  • Login to the Solaris Server via console as root user.
  • Modify the /etc/ssh/sshd_config . Look for the PermitRootLogin entry in the file and change it from no to yes .
PermitRootLogin yes
  • Finally refresh the ssh service so that it re-read the configuration changes you made to sshd_config. For Solaris 10 you can refresh ssh service using svcadm.
     svcadm refresh svc:/network/ssh:default
  • For Solaris 7,8 & 9 you can restart ssh service as below.
     /etc/init.d/sshd restart