Showing posts with label RHEL. Show all posts

Solved: How to use nmtui and nmcli tool to configure network in RedhatLinux

In this post we will see how to use nmtui for network management. This can be a very useful tool for starters in Redhat Linux 7.
  • Login to your server using putty and execute command “nmtui” to invoke the interface. If your machine is not in network you can login via console and follow the same steps mentioned below.
  • If you don’t have the nmtui tool installed, you can install it using yum (Note: If you don’t want to install a new package in your server you can use nmcli for network configuration. Refer the post for how to configure network with nmcli )
[root@cloudvedas ~]# yum install NetworkManager-tui
[root@cloudvedas ~]# nmtui
  • Once you get the interface you can navigate using Arrow keys , Tab key and make selection using “enter” key. So, using arrow key select “Edit a connection” and press enter.


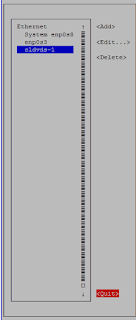
  • We have two network interfaces enp0s8 and enp0s3 . Today we will be configuring enp0s3. As enps0s8 is already configured and in use. So once highlighted enp0s3 go to “Add” and press enter.


  • Select the type of connection. For this tutorial we are selecting “Ethernet”.


  • Once in “Edit connection” section enter “Profile name” , “Device”.  If you want static IP select “Manual” for IPv4 and select “Show”.
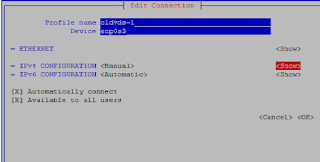


  • Once you select  “Show” enter your IP detail with subnet id. Here subnet id is /24 or 255.255.255.0 . Also enter gateway. If you want to use DNS enter DNS server details else leave it blank and select OK.


  • Once the IP configuration is done select “OK” again. Now you can see the new connection that you have created. Select “Quit” to come out.

  • Now let’s activate the connection. Execute “nmtui” in putty or console again and select “Activate a connection”  and press Enter.
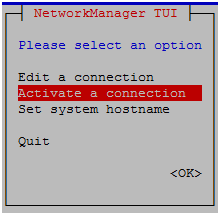


  • Navigate with arrow key select the interface and then move right and Press enter on “Activate”. This will activate your interface as in image below.

  • Check if the new IP is configured.


  • Also let’s check in “nmcli” about the new connection.


If you want to change hostname refer this post on how to change hostname with nmtui or nmcli .
Hope this post is helpful. Do let me know if you have any query.

Solved: How to mount ISO in a linux VM

In this post we will discuss how to mount ISO in Linux VM running inside Virtualbox or VMware.
Virtualbox
You can mount ISO in Linux VM running on Virtualbox by following these steps
  • Select the running machine window.
  • Click on Devices > Optical Devices
  • Choose disk image, browse and select ISO .
  • Now go to the redhat linux server and execute the mount command
 mount /dev/cdrom /mnt
VMware
  • If the linux VM is in VMware. You can select the iso image in vmware console similar to what we did for virtual box.
  • Right click on the machine > “Removable Devices” > “CD/DVD” > Settings. Browse and select the ISO. Check mark on “Connected”.
  • Finally execute the following command in Linux VM.
    mount /dev/sr0 /mnt
  • If you do “df -h” new ISO should be mounted and visible to you as /mnt .
Tip: If you are getting error /mnt busy ensure that /mnt is not already mounted. If /mnt is already mounted either unmount /mnt first and try again or create a new directory and mount the ISO on the new directory.

Solved: How to create a soft link in Linux or Solaris

In this post we will see how to create a softlink.
Execute the below command to create a softlink.
[root@cloudvedas ~]# ln -s /usr/interface/HB0 CLV
So now when you list using  “ls -l”  the softlink thus created will look like.
[root@cloudvedas ~]# ls -llrwxrwxrwx. 1 root root 18 Aug 8 23:16 CLV -> /usr/interface/HB0[root@cloudvedas ~]#
Try going inside the link and list the contents.
[root@cloudvedas ~]# cd CLV[root@cloudvedas CLV]# lscloud1 cloud2 cloud3[root@cloudvedas CLV]#
You can see the contents of /usr/interface/HB0 directory.

What are the maximum number of usable partitions in a disk in Linux

Linux can generally have two types of Disks. IDE and SCSI.
IDE
By convention, IDE drives will be given device names /dev/hda to /dev/hdd. Hard Drive A (/dev/hda) is the first drive and Hard Drive C (/dev/hdc) is the third.
A typical PC has two IDE controllers, each of which can have two drives connected to it. For example, /dev/hda is the first drive (master) on the first IDE controller and /dev/hdd is the second (slave) drive on the second controller (the fourth IDE drive in the computer).
Maximum usable partitions 63 for IDE disks.
SCSI
SCSI drives follow a similar pattern; They are represented by ‘sd’ instead of ‘hd’. The first partition of the second SCSI drive would therefore be /dev/sdb1.
Maximum usable partitions 15 for SCSI disks.
A partition is labeled to host a certain kind of file system (not to be confused with a volume label). Such a file system could be the linux standard ext2 file system or linux swap space, or even foreign file systems like (Microsoft) NTFS or (Sun) UFS. There is a numerical code associated with each partition type. For example, the code for ext2 is 0x83 and linux swap is 0x82.
To see a list of partition types and their codes, execute /sbin/sfdisk -T

Solved: How to scan new LUNs in Redhat Linux

In this post  we will discuss how to scan new LUNs allocated by storage team to a Redhat Linux system.
There are two ways of scanning the LUNs
Method 1:-
Find how many SCSI bus controllers you have

  • Go to directory /sys/class/scsi_host/  and list it’s contents.

cd /sys/class/scsi_host/ 
[root@scsi_host]# ls
host0 host1 host2
[root@scsi_host]#
  • Here we can see we have three SCSI bus controllers. So in below command replace hostX with these directory names.
Run the Command ,
echo "- - -" > /sys/class/scsi_host/hostX/scan 
[root@cloudvedas]# echo "- - -" > /sys/class/scsi_host/host0/scan
[root@cloudvedas]# echo "- - -" > /sys/class/scsi_host/host1/scan
[root@cloudvedas]# echo "- - -" > /sys/class/scsi_host/host2/scan
[root@cloudvedas]# echo "- - -" > /sys/class/scsi_host/host3/scan
TIP:- Here the “- – -” denotes CxTxDx i.e. Channel(controller) , Target ID and Disk or LUN number. This is asked in Linux Admin Interviews also.
  • Repeat the above step for all three directories.
If you have FC HBA in the system you can follow the steps as below:-
  • First check number of FC controllers in your system
#ls /sys/class/fc_hosthost0 host1 host2
  • To scan FC LUNs execute commands as
echo "1" > /sys/class/fc_host/host0/issue_lip
echo "1" > /sys/class/fc_host/host1/issue_lip
echo "1" > /sys/class/fc_host/host2/issue_lip

Tip :- Here echo “1” operation performs a Loop Initialization Protocol (LIP) and then scans the interconnect and causes the SCSI layer to be updated to reflect the devices currently on the bus. A LIP is, essentially, a bus reset,  and will cause device addition and removal. This procedure is necessary to configure a new SCSI target on a Fibre Channel interconnect. Bear in mind that issue_lip is an asynchronous operation.
  • Verify if the new disk is visible now
fdisk -l |egrep '^Disk' |egrep -v 'dm-'
Method 2 :-
  • Next method is to scan using SG3 utility. You can install it using
yum install sg3_utils
  • Once installed  run the command
/usr/bin/rescan-scsi-bus.sh

Solved: How to add swap space in Redhat or Ubuntu Linux

In this post  we will see how we can add a file as swap space in Linux. Same steps are to be followed for Redhat and Ubuntu Linux.
Type the following command to create 100MB swap file (1024 * 100MB = 102400 block size):
dd if=/dev/zero of=/swap1 bs=1024 count=102400
Secure swap file
Setup correct file permission for security reasons, enter:
# sudo chown root:root /swap1# sudo chmod 0600 /swap1
Set up a Linux swap area
Type the following command to set up a Linux swap area in a file:
# sudo mkswap /swap1
Activate /swap1 swap space :
# sudo swapon /swap1
Update /etc/fstab file to make it persistent across reboot.
vi /etc/fstab
Add the following line in file:
/swap1 swap swap defaults 0 0
To check if the swap file is added or not
Type the following swapon command:
#sudo swapon -sFilename Type Size Used Priority/dev/dm-0 partition 839676 0 -1/swap1 file 102396 0 -2
It should show you the new file.
If you want add a logical volume for swap please refer how to add LV for swap .

How to add logical volume for swap in Redhat Linux

In our last post we have seen how to add a file for swap space.
In this post we will see how to add a LVM2 Logical Volume as swap.
Here we have a VG name VG1 in which we will create a volume LV1 of 1GB.
# lvcreate VG1 -n LV1 -L 1G
Format the new swap space using mkswap:
# mkswap /dev/VG1/LV1
Update /etc/fstab file with below entry:
# /dev/VG1/LV1 swap swap defaults 0 0
Enable the extended logical volume:
# swapon -v /dev/VG1/LV1