AWS DynamoDB Cheat Sheet


DynamoDB is fast and flexible noSQL DB service for all application that need consistent single digit millisecond latency at any scale. It is a fully managed DB and support both document and key value data models.It is great for IoT, mobile/web gaming, and many other apps.


Quick facts of dynamodb
  • Stored on SSD storage
  • Spread across 3 geo distinct Ds.
  • Eventual consistent reads:- Consistency across all copies is usually reached within a sec. Repeating a read after short time should return the updated data.(Best Read perf)
  • Strongly consistent reads:- It returns a result that reflects all writes that received successful response prior to the read.

Table
Items(Like row of data in a table)
Attributes(Like column of data in a table)


Here everything between brackets {} is Item and 1587, Alan etc. are attributes.

{
"ID" : 1587,
"Name" : "Alan"
"Phone": "555-5555"
}


Two types of primary keys available:-
Single Attribute(Think unique ID)
Partition Key (Hash Key) composed of one attribute.

Composite(Think unique ID and date Range)
Partition key and Sort key (hash & Range) composed of 2 attributes


Partition key
  • Dynamodb uses the partition key 's value as input to an internal hash function. The output from the hash function determines the partition(this is simply the physical location in which the data is stored)
  • No two items in a table can have the same partition key value.


Partition Key and Sort Key
  • Dynamodb uses the partition key 's value as input to an internal hash function. The output from the hash function determines the partition(this is simply the physical location in which the data is stored)
  • Two items in a table can have the same partition key , but they must have a different sort key.
  • All items with the same partition key are sorted together , in sorted order by sorted key value

Local secondary index
  • It has the same partition key but different sort key
  • Can only be created when creating a table. they cannot be removed or modified later.


Global secondary index:
  • It has different partition key and different sort key.
  • Can be created at table creation or added later.


DynamoDB streams
  • If a new item is added to the table, the stream captures an image of the entire item, including all of its attributes
  • If an item is updated, the stream captures the before and after image of any attributes that were modified in the item.
  • If an item is deleted from the table, the stream captures an image of an entire item before it was deleted.

Query:-
A query operations find items in a table using only primary key attribute values. You must provide a partition attribute name and a distinct value to search for. You can optionally provide a sort key attribute name and value, and use a comparison operator to refine search results.
By default, a query returns all of the data attributes for the items with specified primary key(s) however you can use the ProjectionExpression parameter so that the query only returns some of the attributes, rather than all of them.

Query results are always sorted by the sort key. If the data type of the sort key is a number the results are returned in numeric order. Otherwise, the results are returned in order of ascii character code values. By default the sort order is ascending. To reverse the order set the ScanIndexForward parameter to false.

By default is eventually consistent but can be changed to strongly consistent.

SCAN:-
A Scan operation examines every item in the table. By default, a scan returns all of the data attributes of every item however you can use the ProjectionExpression parameter so that the scan only returns some of the attributes, rather than all of them.

Hope you find this quick glance of DynamoDB useful. Do let us know in comments if you have any query or suggestion.

Today we also want to share with you a good news that our blog is now included by Feedspot in the list of AWS Top 10 blogs . We would like to thank you all for your help and support in achieving this.

AWS certification exam cheat sheets

AWS certification exams grill you on vast topics and lot of services. In this post we have consolidated major services and topics of different exams so that you can access them from a single location.

Below links will give you better info on which topics and services are important for each exam and how to best prepare for them.

Solved: How to use nmtui and nmcli tool to configure network in RedhatLinux

In this post we will see how to use nmtui for network management. This can be a very useful tool for starters in Redhat Linux 7.
  • Login to your server using putty and execute command “nmtui” to invoke the interface. If your machine is not in network you can login via console and follow the same steps mentioned below.
  • If you don’t have the nmtui tool installed, you can install it using yum (Note: If you don’t want to install a new package in your server you can use nmcli for network configuration. Refer the post for how to configure network with nmcli )
[root@cloudvedas ~]# yum install NetworkManager-tui
[root@cloudvedas ~]# nmtui
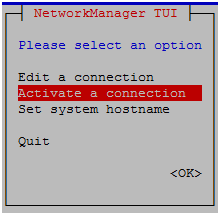
  • Once you get the interface you can navigate using Arrow keys , Tab key and make selection using “enter” key. So, using arrow key select “Edit a connection” and press enter.


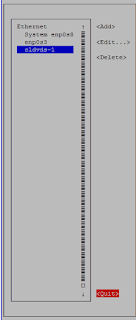
  • We have two network interfaces enp0s8 and enp0s3 . Today we will be configuring enp0s3. As enps0s8 is already configured and in use. So once highlighted enp0s3 go to “Add” and press enter.


  • Select the type of connection. For this tutorial we are selecting “Ethernet”.


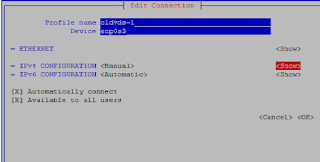
  • Once in “Edit connection” section enter “Profile name” , “Device”.  If you want static IP select “Manual” for IPv4 and select “Show”.


  • Once you select  “Show” enter your IP detail with subnet id. Here subnet id is /24 or 255.255.255.0 . Also enter gateway. If you want to use DNS enter DNS server details else leave it blank and select OK.


  • Once the IP configuration is done select “OK” again. Now you can see the new connection that you have created. Select “Quit” to come out.


  • Now let’s activate the connection. Execute “nmtui” in putty or console again and select “Activate a connection”  and press Enter.


  • Navigate with arrow key select the interface and then move right and Press enter on “Activate”. This will activate your interface as in image below.

  • Check if the new IP is configured.


  • Also let’s check in “nmcli” about the new connection.


If you want to change hostname refer this post on how to change hostname with nmtui or nmcli .
Hope this post is helpful. Do let me know if you have any query.

Solved: How to cap or limit memory usage of a docker container

In this post we will see how we can cap or restrict the maximum amount of memory the container can use.
Let’s first see the current usage of container id ec6ed4af7c34 with “docker stats”.
docker stats ec6ed4af7c34
In the below image we can see the current limit of the container is 300MiB


Now let’s change this limit to 200MiB of a running container.
docker container update -m 200m ec6ed4af7c34
Now when we look at “docker stats” we can see in the image below the new limit on the container.


If you want to set the memory limit at the time of launching the container itself do it as
docker run -exec -it -m 200m image-name /bin/bash
Compose file version 3
If you want to restrict the usage from the compose file itself you can follow below example, the redis service is constrained to use no more than 50M of memory and 0.50 (50%) of available processing time (CPU), and has 20M of memory and 0.25 CPU time reserved (as always available to it).

version: '3'
services:
  redis:
    image: redis:alpine
    deploy:
      resources:
        limits:
          cpus: '0.50'
          memory: 50M
        reservations:
          cpus: '0.10'
          memory: 20M

Hope this post is helpful to you. Do let me know if you have any query.

AWS ECR : How to push or pull docker image

Hello everyone!
In this post we will see how to push a docker image to your AWS ECR  and how to pull image from it.
Pre-requisites:-
  • Skip this step if you already have docker on your machine. I am using  “Docker for Windows” software to run dockers on my Windows 10 laptop.
If you have Windows 7 download Docker Toolbox for Windows with Virtualbox.
  • Get AWS CLI.
  • Create AWS IAM user from AWS console which has permission to put and delete images. You can refer sample policy below.
{
    "Version": "2012-10-17",
    "Statement": [
        {
            "Sid": "VisualEditor0",
            "Effect": "Allow",
            "Action": "ecr:*",
            "Resource": "*"
        }
    ]
}
Once you are done with pre-requisites let's move forward.
1)  Open powershell in windows or command prompt in linux. Below I'll be running command on windows powershell. But the AWS CLI command on linux are similar.
In powershell check that you have docker running. It should give you an output like below.
PS C:\CloudVedas> docker ps -a

CONTAINER ID IMAGE COMMAND CREATED STATUS PORTS NAMES

55f016be65aa hello-world "/hello" 2 hours ago Exited (0) 2 hours ago gifted_hamilton

PS C:\CloudVedas>
2) Configure AWS CLI by entering the access key and secret key of the IAM user.
PS C:\CloudVedas> aws configure
AWS Access Key ID [****************A37B]:
AWS Secret Access Key [****************W3w3]:
Default region name [ap-southeast-2]:
Default output format [None]:
PS C:\CloudVedas>
3) Check if your IAM user is able to describe ECR.
PS C:\CloudVedas> aws ecr describe-repositories
{
    "repositories": []
}
PS C:\CloudVedas>
4) Let's create an ECR repository now. You can skip this step if you already have repo.
PS C:\CloudVedas> aws ecr create-repository --repository-name cloudvedas
{
"repository": {
"repositoryArn": "arn:aws:ecr:ap-southeast-2:123456789123:repository/cloudvedas",
"registryId": "123456789123",
"repositoryName": "cloudvedas",
"repositoryUri": "123456789123.dkr.ecr.ap-southeast-2.amazonaws.com/cloudvedas",
"createdAt": 1564224171.0
}
}
PS C:\CloudVedas>
5) Next we will authenticate the Docker client to the Amazon ECR registry to which we intend to push our image. You will get a long docker login token as below.
PS C:\CloudVedas> aws ecr get-login-password --region ap-southeast-2

6) Enter below the long token that you will receive in response of above command.
docker login -u AWS -p <token> https://123456789123.dkr.ecr.ap-southeast-2.amazonaws.com
Login Succeeded
You will see "Login Succeeded" message once you are logged in successfully. Continue to Step 7 if you want to push image. Skip to step 10 if you want to pull image from ECR.
Push Image
7) Tag your image with the Amazon ECR registry, repository, and optional image tag name combination to use.
PS C:\CloudVedas> docker images
REPOSITORY TAG IMAGE ID CREATED SIZE
hello-world latest fce289e99eb9 6 months ago 1.84kB
PS C:\CloudVedas>

PS C:\CloudVedas> docker tag fce289e99eb9 123456789123.dkr.ecr.ap-southeast-2.amazonaws.com/cloudvedas


PS C:\CloudVedas> docker images
REPOSITORY TAG IMAGE ID CREATED SIZE
123456789123.dkr.ecr.ap-southeast-2.amazonaws.com/cloudvedas latest fce289e99eb9 6 months ago 1.84kB
hello-world latest fce289e99eb9 6 months ago 1.84kB
PS C:\CloudVedas>
8) Next let's push the image.
PS C:\CloudVedas> docker push 123456789123.dkr.ecr.ap-southeast-2.amazonaws.com/cloudvedas
The push refers to repository [123456789123.dkr.ecr.ap-southeast-2.amazonaws.com/cloudvedas]
af0b15c8625b: Pushed
latest: digest: sha256:92c7f9c92844bb49837dur49vnbvm7c2a7949e40f8ea90c8b3bc396879d95e899a size: 524
PS C:\CloudVedas>
9) We just now pushed the image. Let's check our image in ECR.
PS C:\CloudVedas> aws ecr describe-images --repository-name cloudvedas
{
"imageDetails": [
{
"registryId": "123456789123",
"repositoryName": "cloudvedas",
"imageDigest": "sha256:92c7f9c92844bb49837dur49vnbvm7c2a7949e40f8ea90c8b3bc396879d95e899a",
"imageTags": [
"latest"
],
"imageSizeInBytes": 2487,
"imagePushedAt": 1564224404.0
}
]
}
PS C:\CloudVedas>
Great ! We can see our image in ECR and it has a tag "latest".
Pull Image
10) If you want to pull the image you have to follow same instruction till step 6, after that just execute below command.
PS C:\CloudVedas> docker pull 123456789123.dkr.ecr.ap-southeast-2.amazonaws.com/cloudvedas:latest